20 December 2016

Why I'm Doing a Month-Long Colouring Challenge

During October I did a month long art challenge called Inktober which really helped me to improve my inking skills so this December I decided to do something similar. I decided to do a month long colouring challenge where I aim to colour in a whole colouring book before Christmas Day. It's proved to be very difficult but I think that I'm really benefiting from the challenge so I thought I'd share the idea with you in this post.
The reason I thought of this idea was because I saw the colouring book called 'Colour Yourself Advent Christmas Countdown' that was drawn by Heartfelt Illustrations (see the Facebook profile on this link). The book inspired me because it seemed that there was a page for every day of the month so I decided to colour one page every day. Unfortunately December is a very busy month so I haven't done one page per day but have tried my best to get close to that target. I used my Prismacolour pencils and gel pens o colour all of the pages and it's been really useful for me. This page was for the 1st of Decemeber and was a snowman. I learnt a lot from this first page because looking back I can see that I went a little overboard on the snowflake details so on future pages I didn't draw anything onto the backgrounds.

 One of the main things that I have improved on during this challenge is blending without blending tools. Normally, I would sue a colourless blender pencil or a blending stump to help me to create a smooth gradient. However, during this challenge I decided not to use any blending tools. This has meant that each page takes about double the time than usual, but now I have really improved my blending skills. I've found lots of ways to blend properly now such as: using a white pencil, using varied pressure on my pencils, building up tone gradually, etc. I struggled on the first few days to go without blending tools but after a while it got easier.
 By the time I coloured page five, I had got very behind on the daily schedule. I had to start catching up with colouring fast. I'm still actually behind by nine pages. I think that doing colouring almost every day has helped me with my working speed. I struggle with time management so I try my best to do organisation and time limits, etc but doing month-long challenges has proved to be the most effective method to help me with time management. I've never produced more art or colouring than during Inktober and the colouring challenge this month,


Another reason that I've done this challenge is not only to improve my colouring, but for fun too. I love Christmas so a Christmas themed colouring book is perfect for me. Colouring in festive art every day is great because it gets me excited for Christmas. There's only 5 days until Christmas now! Can you believe it? Christmas is my favourite time of year so I try my best to make it last. I love chocolate advent calendars but this colouring one is really unique. It's been great counting down the days until Christmas with this because it's something a little different and keeps me busy all the time. I've only shown you photos of some of the pages but half of them have activities on them which inspire me.


 I'm looking forward to next December too because I can display my advent calendar once it's finished. This year I haven't displayed it because I would have had to take it up and down to switch between colouring and displaying it. I think it's great that with this book you can use it as a colouring book and a calendar because I can look back next year and see how my colour application has changed. Maybe I'll even colour another one next year to compare them-who knows? It's nice to look back on old art or colouring or anything because it shows that with practise I can improve my skills and techniques. It keeps me motivated to carry on even if I aren't happy with my current skill. If you're an artist,colourer(I'm not sure what it's called),etc  then I recommend that you look back at old art or colouring to keep you going.

 Overall this challenge has been difficult but worth it. Every time I do a month-long challenge, it's very tiring for me but when reflecting back on it I feel proud of what I've achieved. I know that some people just think colouring is a hobby, but for me colouring helps me to improve colour application for my own art. That's why I feel like doing this challenge is a real achievement because I'll be able to see a difference in my own art next year. Hopefully next time I do a month-long challenge I'll have time to do it every day as planned. Maybe it would be wise not to choose December for my month-long challenge next time! It's a busy time of year so doing this has been a little stressful. I've loved building up the colouring book though and seeing what I can do when I really push myself. I hope that I've inspired you to do a month-long challenge whether you use an official one like Inktober or come up with your own like I have this month!

That's all for this week's post. Sorry that I missed last week but as you can see from this post I've been very busy recently. I've noticed that although I set a schedule of posting every week, I keep missing a post. Therefore, I think that in the new year I might make a few changes to the schedule and my blog so that it's less stressful for me. Anyway, I hope you enjoyed seeing my colouring pages and hearing about this challenge.

Over to you...
Have you ever done a month-long challenge? Tell me about it in the comments. Do you enjoy colouring, any tips? Also, what are you doing for Christmas? I'd love to know.


05 December 2016

Christmas Card Craft Idea

Hello everyone! I'm finally back with another post and it's my first Christmas one!I've had lots of revision to do recently so I took a few weeks away from blogging but I missed it so I'm back this week. Today I've got a lovely Christmas card idea for you to craft for your friends and family so get cosy and see how I made a wreath card!

 Firstly I chose a Christmas patterned paper, a plain card, a bow, a doily and a few Christmas washi tapes. You can find all these supplies (or similar ones) at The Works or The Range. These are two of my favourite shops for craft supplies since they sell a wide range of products for good prices. In ended up not using the button you can see in the photo or all of the washi tape but you might decide you want to. As yopuc an see I have quite the collection of Chrsitmas-y washi tapes-I've been collecting lots in the last few months!
 Now that you've got the basic supplies you can now choose all of the embellishments. You'll use these to decorate the wreath so you'll want small, festive embellishments. The ones you can see in the picture are: silver star stickers, enamel dots, crystal stickers, a range of Christmas stickers and Christmas phrase stickers. You probably won't sue them all on one wreath but I just got out plenty of embellishments so I could choose what looked best. I actually went with the crystal stickers, stars and mini candy cane stickers for the wreath. I also used a Christmas phrase sticker elsewhere on the card. I liked how the red crystal stickers looked like berries, the yellow crystal stickers looked like flowers and the green crystal stickers looked like sprigs or leaves. The enamel dots would have given the same effect but I wanted to give a sparkly effect to the card! By the way, some of these products were from a subscription box last month called Birmbles Box.
Here's the final result! started by cutting a strip of patterned paper and glueing it n the left side of the card as an accent. Originally, I was going to make a background with it but I think it would have been too overpowering. I cut the middle of the green doily out so that it looked like a wreath. Once you've glued down the patterned paper and green doily you can personalise it however you want! This is where the embellishments come in! I spread out the crystal stickers, stars and candy canes evenly around the wreath. After decorating the wreath, I created the ribbon. In chose a washi tape and cut a small section of it to go above the wreath, To give the impression of a real wrath, I then put a bow on top of the washi tape. I used double sided sticky tape for this. To finish off, I used washi tape and a phrase stcker in the centre.

There you go, that's how I made the wreath Christmas card and I love how it turned out! It's such a unique card; I thought of it when I was looking at my Christmas craft supplies, I knew I wanted to use a doily but I didn't want to just stick it down so I did this instead! So now you're ready to make your own Christmas cards, let me know if you make any.

PS: I've changed the background for Christmas now. Do you like it? I created it with the PicMonkey overlays, sorry that I didn't draw any of the elements this time round. Hopefully my next background will have some of my drawings.

Over to you...
Have you made this card idea or any other Christmas cards this year? Tell me about it in the comments. Also, do you have any Christmas blog post ideas? I'm looking forward to writing plenty of Christmas posts!

13 November 2016

Halloween, Day of the Dead and Bonfire Night in Photos

 Hello everyone! Autumn and Winter are probably my favourite seasons for several reasons, but the main one is probably because of all the fun festivities! In the last few months I've celebrated Halloween, Day of the Dead and Bonfire Night. Every year I celebrate Halloween and Bonfire Night, however I don't normally celebrate Day of the Dead since it's a festival from Mexico that isn't typically celebrated where I live. I love to explore different country's cultures and Day of the Dead is a Mexican tradition that interests me so that's why I took part in it this year. In this week's post, I wanted to share with you a few pictures that I've taken during my celebrations so you get to know how I like to enjoy the Autumn season!


 These first two photos were taken on the run-up to Halloween. Something i love to do in October is to watch Halloween movies. We have a collection of spooky DVDs that I watch every year, they inspired me to draw my Inktober art (that I talked about in this post). In these two pictures you can see 'The Corpse Bride' and 'Little Shop of Horrors'. I reccommend these films along with: 'Beetlejuice', 'Coraline' and 'Ghostbusters'!
 This second photo was taken on the day before Halloween. That day I was busy preparing the living room for the party we were going to have the next day! I bought these paperchains from HobbyCraft which I used sellotape to put together. I think that making your own paperchains is relaxing and adds a homemade charm to your party room! Paper chains are quite common at Christmas but I think they look great at all occasions when they have different patterns on! These have: spiders, skulls, bats and pumpkins on them so they're perfectly spooky! This year we got several new Halloween decorations which was nice to see. Previously we had paper skeletons decorations (which were still great decorations) but now that we have swapped them for a few more decorations, the room looked a little more sophisticated.

 Here's the main Halloween decoration we had. It's a Halloween tree which more and more people have been using for their parties. It's like a Christmas tree but black and covered with Halloween baubles, lights and other decorations. I'm not sure how I feel about this, since I am a lover of Christmas so this feels a little strange. It reminds me of the film 'Nightmare Before Christmas' actually, where Halloween takes over Christmas. But I suppose that's a good thing! We used lots of the new decorations such as the tinsel animals, pumpkin ceramic dish, wicker pumpkin, bat cauldrons and more. You can also see a bit of the paper chains in this photo too! What do you think about Halloween trees? An interesting twist on Halloween or just bizarre? It was certainly a talking point at the Halloween party we had.


Now onto Day of the Dead! this photo is kind of a mixture of \Halloween and Day of the Dead because it has our Halloween pumpkin and crackers but has my Day of the Dead cup in it. This cup was from Aldi in case you want it, I'm not sure if they'll sell it since Halloween and Day of the Dead have been and gone. I have quite a few pretty cups in the cupboard-it's practically overflowing! Plenty of mason jars and even a pineapple cup! As you have probably figured out already from previous post, I am a little obsessed with pineapples! xD
 This next photo is another one from Day of the Dead! This shows what I got up to on November the 1st and 2nd. These are my two Day of the Dead themed colouring books: one by Thaneeya McArdle and the other is a mask colouring book from Aldi. You may have seen some of my colouring from Thaneeya's book before and you'll see more soon. I know it's been a while since the last 'Colouring Quest; post, but that's because I devoted my time in October to doing Halloween posts and Inktober drawings. I didn't celebrate Day of the Dead in the traditional way of creating altars and giving food to the dead but instead I used it as 2 days to get creative with colour.
Last but not least, here's my photo from Bonfire Night. There's only one for this celebration because it's hard to get a good photo when it's as dark as it was. I thoroughly enjoyed Bonfire Night this year: we watched fireworks, ate yummy food  and sat by the fire. In this photo, you can see my toffee apple that I held up in front of the fire. I love this photo because of the contrast of bright, warm colours and pitch black. You can see the toffee coating glistening in the glow of the fire. I also filmed a short video of a firework for my Instagram. All of these photos were from my Instagram but since it's a private page, I thought I would share them with you all in this post. I have loved taking lots of photos recently, they remind me of all the lovely occasions.

That's all the photos I have to share with you from the recent festivities, I hope you've enjoyed them! If you want to see some more of my photos then you should read 'My Winter in Photos' from last year by clicking here. I might do another similar post later this year too since I'm always inspired to do photography at special occasions such as Christmas.

PS: Sorry that I have missed two weeks of blogging-I just wanted to take a short break after having such a busy October and early November!

PPS: I've changed my background again to be an Autumn themed one. I used my butterfly drawing and then some PicMonkey overlays to build it up. I tried to make it tile like usual, but it didn't seem to work so I left it large.

Over to you...
Did you celebrate any of these occasions, if so what did you do? Also, are you looking forward to Christmas? I know I am, there'll be a few festive posts in the run-up to December 25th! 

25 October 2016

Coraline Costume Design 2016


 Hi everyone! Halloween is just around the corner now, so that's why I've decided to share my costume design for this year! If you don't know what you're going to be for Halloween, this will give you an idea! I love to watch the film 'Coraline' at Halloween so this year I decided to dress up as her. I've got a few pieces that I'm planning on wearing but I wanted to picture how I was going to wear them, that's why I drew out my design!

Here is my costume design for this year! I started by drawing it out in the pencil and then used my stabilo coloured fineliners to go over the liners and colour it in! Normally, I would just use my Prismacolour coloured pencils for something like this but I wanted to use this as my Inktober drawing yesterday so I used fineliners! I know that the anatomy isn't very accurate (especially on the legs) but this was just to give me an idea of what my costume will look like when I wear it! I don't always draw a costume design every year but it's helpful to look back on when you're getting ready so you can check if you've got everything on! For example, I might forget to draw freckles on my cheeks but when I look at this I'll know where I made a mistake! There's some parts of this design that I haven't got yet: the fimo clay rock/sweet and the dragonfly clip are yet to be made. Also, I don't think I'll wear the yellow wellies because a.I don't have any and b. I'm wearing this for an indoor party.

As well as the costume design, I wanted to show you a few elements of my outfit in this post! Here's the handmade Coraline doll that I talked about in a previous post. If you want to know how I made it, go to the post from two weeks ago by clicking here. It was based on the doll in the film that Coraline's neighbour/friend Wybe gave to her. Wybe found the doll in his Grandma's house, she wasn't too happy that he gave it to Coraline (you'll find out why if you watch the film which I highly recommend)! It isn't an exact copy of the doll that is in the film but it has a similar style. The doll is quite an important part of the story so that's why I chose to make this as part of my costume. However, you don't have to make or buy one to make your outfit a good representation of Coraline.
The last thing I wanted to show you in this post is the yellow anorak that I'm wearing on Halloween! I was surprised when my Mum said she had found i in a charity shop for me because I was worried that I wouldn't find one in time for Halloween! If you're looking for a cheap costume then I recommend that you look in charity shops for the items that you need! It wasn't in the first charity shop that was looked in though, apparently it was found in about the 7th one! So don't think it's an easy task to find the perfect costume for a small price! But putting together your outfit is half the fun! It's great to see it come together piece by piece until you've got the whole costume! The good thing about Coraline's outfit is that everything looks ordinary. This means that I can wear things like the raincoat again. By the way, Coraline wears other outfits in the film such as the starry jumper so there are several options!

I hope that this post has inspired you to choose a fun Halloween costume! I'm looking forward to Halloween, I'll make sure I have a picture of me in the costume to share with you! Come back next week to see my last Halloween post which will be about what I did (will do) on Halloween!

PS: My first blogging tips post was published on Cathy Cassidy's blog (Dreamcatcher) a while ago. Click here to see it! I'm working on a second one now as well!

Over to you...
What are your plans for Halloween, are you dressing up and going to a party, staying at home to watch scary movies or something else? Also, what are your Halloween movie recommendations? I'm also looking for new ones! Let me know in the comments! 

17 October 2016

Why I'm Doing Inktober!

 Hello everyone! Inktober is a month long drawing challenge where you draw one ink drawing for every day of October. Some people don't draw absolutely every day, but I try my best to draw every day (I think I've only missed one day so far). You can draw whatever you want as long as it's in ink! There are some prompts that you can find on social media but I just draw what I feel like each day! Most of the things I draw are Halloween or Autumn themed because this season is so inspiring-don't you think? Gorgeous colours, a gentle breeze and that fresh start feeling!

So, why am I doing Inktober? I am doing Inktober for many reasons. Firstly, it is an interesting challenge to post on social media! I recently got Instagram so doing Inktober is a great excuse to post every day ha-ha! I love creating new, creative content for my Instagram and this blog! Any excuse to draw every day is good enough for me! I feel like I am on a roll at the moment in terms of art, I just started my GCSE art course and it feels like I am drawing every spare minute! I'm loving it though! Taking my art sketchbook home is fun to develop my school work and then I draw my Inktober things to create a personal sketchbook! Unfortunately focusing on drawing means that I am doing less of other things such as: fashion design. Sorry that I haven't posted a fashion design post for a while but I will try in November once the challenge is over!


Another reason I am doing Inktober is to build up a 'stash' of drawings that I can then edit! An example of my edited ink drawings is on the right! Here's an edited version of the owl ink drawing I showed you above! I started by scanning it and then taking it to Photoshop where I cleaned up the lines, removed the white background and coloured it in. I then saved it as a png. I then went to PicMonkey (an editing website) on the design feature where I made a background and then added the owl as an overlay. I like to take my ink drawings into digital art because it progresses the simple drawings into professional-looking art. I then use these as Inktober posts (which is cheating but oh well)!xD

The main reason I am taking part in Inktober is to improve my inking skills. I don't think that 'inking' is my strength in art so doing Inktober has helped a lot. In my art course, you get higher marks for experimenting (using different mediums, techniques, etc) so using ink is a skill I need to be skilled at. I do think that doing Inktober has been an effective way of developing my skills with biros and fineliners. You can see that this drawing on the left is much more comlex and 'better' (I mean more detailed) than the owl drawing at the top. This is actually my favourite drawing so far. This was my first time experimenting with the cross-hatching technique and I think it worked well! It took me a long time (until I thought of putting this in the bin) but you have to put time in to see improvement! You can clearly see the development so I think this has been a useful challenge!

The last reason I am doing Inktober is so I can improve my blog! You will have seen my new Halloween background that will be here for October. This was actually made with the skull drawing I showed you above! I have decided to make all my blog backgrounds since the pineapple one I had last month, by myself! This will improve my blog by making it unique to me! Another way Inktober will improve my blog is because it has helped me get used to drawing often! This means that I will be able to produce art faster in the future so I can post my art more often on here (remember I am aiming to post every week)! I am enjoying improving my blog content, I wonder how it will have changed this time next year? It's these sorts of wonderings (this isn't a word is it) that make me look forward to the future!

I hope you enjoyed this post full of my Inktober art! I recommend that you do any daily art challenge (it doesn't have to be Inktober) because it gives you the results that you want and sparks your creativity!

Over to you...
Have you ever done an art challenge such as Inktober? How did it go? Let me know in the comments! If not, would you ever try it? 

11 October 2016

Craft Project Idea:Coraline Doll

 I love celebrating Halloween (and all celebrations really) and I love crafting so I thought I would combine the two in this week's post! This week, I have been making a doll from the Coraline film using felt! I'll be using this as part of my Halloween costume this year, which as you can probably guess, will be a Coraline outfit! Coraline is one of my favourite Halloween films because it perfectly mixes creepy with cute and the animation style is beautifully stunning! Hopefully this will give you a few ideas for your next project, it's not necessarily a tutorial but i'll tell you the basic steps I took to make Coraline!

To start making this doll, I decorated her face! I chose two shiny,black buttons for her eyes and sewed them in place. Next, I drew on the felt where I wanted the lips, eyebrows and freckles to be. You can draw quite easily with biro to give you an idea where to sew! Then I started to sew the rest of the facial features! I used satin stitch for her eyebrows, french knots for her freckles (which are quite complex stitches, so I recommend you practice them on a fabric scrap first) and I haven't sewed the lips in this photo yet! I then created two hair pieces out of blue felt! I started by cutting out a basic hair outline for the front and back and then cut strips of felt, which were then sewed onto this larger piece! This helped to add texture to the doll which adds interest!


In this next picture, I have started to add clothes and sew her lips on. For the lips, I used basic running stitch down the centre (in brown thread) and then filled above and below the line (in light pink thread) in whatever way I could. i'm not sure if the technique I used has a name but I just imagined the thread was a pen and I was colouring in the lips. If you're confused, I mean that I simply put my needle through at the top and put it back at the bottom, then moved along to the right and went through at the bottom and then out at the top, and then repeated until it was done. Sorry if you don't understand, it's hard to explain! I then sewed on a dark pink vest which I then sewed light pink strips onto with running stitch that was spaced apart. I then put a black strip to be the skirt waistband (I put the skirt on in a later picture). After this I sewed on white socks which has black stripes sewn on. Finally I made yellow boots with laces!
In this photo, you can see Coraline stuffed! She was sewn up using blanket stitch in a skin tone. As I stitched, I added little bits of stuffing to make sure I didn't miss any gaps. I probably would have missed gaps if it was stuffed after sewing most of it up. It can be fiddly to sew and stuff simultaneously but this method is the most effective to evenly stuff. Take your time to sew it up because you don't want to leave large paces between each stitch because the doll will easily fall apart and the stuffing will come out; you don't want that!  I forgot to mention earlier, I added a little clip in Coraline's hair that she has in the film. If you add all these little details, it makes for a more accurate costume (but if you're short of time, you can just create an impression of Coraline rather than a close replica).


This last photo shows Coraline now that she is completely finished! The things that changed from the last picture to this one, is the fact that she has all her clothes now! Here she is in her lovely yellow anorak that was sewn up using three pieces (1 for the back and 2 for the front) which was then turned inside out and decorated with a collar and buttons! She is also wearing a  black skirt that was made using layers of different fabrics: black felt, a black ribbon,taffeta and netting! the reason I use different fabrics is to add interesting texture and depth to the piece of clothing! I didn't want it to just lay flat on her legs.  I love the way that she turned out! She is cute but also a little bit creepy, just like in the film! I think this will be a great addition to my costume that I'm wearing on Halloween. I'll also keep her afterwards because she looks great!


If you make this, I hope you have a lot of fun like I did when I made this! You could make it with a friend or family member who's experienced with sewing if you'd like! I made mine with my Mum who's an experienced sewer!

Over to you...
What are you wearing for Halloween? Let me know! Did you give this project a go? 


27 September 2016

What's in my Sketchbook 2

Hello everyone! Today I'll be sharing with you the contents of  my sketchbook (or to more accurate, my sketchbooks)! I previously wrote part one of this 'What's in my Sketchbook' as a guest post with 5starartists.blogspot.co.uk. See my first skecthbook post here. I think that my art has improved a lot since then so I thought I would share a part two this week! Enjoy!


My first drawing in this post is of a leaf. I drew this one a long time ago (last year) but I wanted to share it with you because I quite like it. I drew it in my old sketchbook so the quality is not the best. I used to use a watercolour sketchbook for drawing in which is not the right sort of paper. You can see that it smudged a lot and the lines aren't of the best quality, this is because of the paper type I used. However, I enjoyed drawing this seasonal art because it made me excited for Autumn. Now that it's Autumn again I am starting to draw seasonal artwork again, such as the Halloween lineart at the end of this post! Autumn and Winter are probably my favourite seasons because of all of the fun celebrations that take place in this half of the year. I love celebrating with my family and friends because of all the wonderful traditions and decorations that fill the house. Halloween is coming up next month and I'll be writing several spooky posts soon! 


This next piece of art is of a dancer. I was experimenting with drawing things in motion so I found a reference of a dancer on pinterest and started drawing! I don't, like how I've drawn the dancer's head and neck since it looks realistic but I quite like the rest of  the drawing! My favourite part of this is the fabric that is flowing behind her. It looked strange as I was drawing it but when I added tone, it started to look really interesting. I am interested in fashion design so I enjoyed practising drawing the folds in fabric. In the future, I would probably like to re-draw this art because it has an interesting subject but there are a few features that I think I could improve now with more experience. During drawing this, I learned how to draw legs. Although they're not perfect, I now know how to sort of make the curves look right. 
The third drawing I want to show you is this banana leaf. I drew this only a few weeks ago in my new sketchbook. I don't always use colour (which is strange since I love colouring books) so for this drawing I wanted to incorporate colour into it. I started by sketching out an outline in pencil which I later went over with black fineliner. I then added texture with a dark green watercolour paint. Once it dried, I went over with lighter shades of green and yellow to finish it off. I regretted adding the texture first, but now I think that actually it looks quite nice with a subtle texture. Believe it or not, I actually have a banana plant growing in my bathroom! xD That's what I used to draw this from after taking a quick photo on my phone. It's been growing for several years since I received some banana tree seeds in my stocking one Christmas! I never thought it would grow as huge as it has! Obviously it doesn't grow bananas on it since it is not warm enough in England to grow them but there are lots of vibrant, massive leaves on it!
The next drawing was a challenge that I completed. One of my penpals and I like to challenge each other to do something creative each time we write to each other. It's very fun and helps me to be creative! This particular challenge was to draw one thing in a medium that I'm not confident with and one drawing in a medium I am confident with. This one is drawn in biro which I'm not confident with and is a made-up flower drawing...


and here's the other drawing! this one is the challenge art that was drawn in a medium I am confident with! I chose to use my Prismacolour colouring pencils for this artwork. This is my favourite drawing in this post and one of my best drawings in quite a while. I absolutely loved drawing this and it was very calming to just blend away at this drawing!  This took me a long time to draw but it was worth it!
The last drawing in this post is a line drawing of a Halloween witch. Like I said earlier, I love celebrations such as Halloween, they just feel very magical and fun! That's why I decided to draw a witch recently. I enjoyed collecting lots of references of interesting witches on pinterest to inspire me. I was very engaged whilst coming up with an interesting witch outfit, so I had the idea that perhaps I could draw several witches all with different outfits, is that something you would like to see? This is an unfinished drawing because I want to draw a few more details and add colour. I think I might write a separate post about the finished drawing when it's done (it will probably be quite similar to this post I wrote last year). I'm looking forward to uploading Halloween themed posts this year; I've got several ideas and there will be more than last year, since I am now trying to write posts weekly! If you've got any Halloween post ideas please share them in the comments because I might write them! 


I hope that you all enjoyed seeing the contents of my sketchbook! I will be drawing more often in the upcoming months because I want to improve my skills and start experimenting to find my style so you might be seeing more art posts soon! I'm also working on a drawing collab with 5StarArtists, we're drawing disney princess fanart (anyone who wants to join in click on this link). We're both looking forward to sharing the finished art with you, so you'll see that art too! 

Over to you...
What Halloween post would you like me to write? Give your suggestions in the comments. Also, feel free to give me your feedback on my art! I'd love to hear your opinions!

19 September 2016

Penpal Goodies Ideas

One of my favourite parts of writing and receiving letters are the goodies! I love to come up with fun ideas for little presents to send to penpals and I get so excited to see what awesome things my penpals have chose to sent me. They are very thoughtful people! Today I'll be showing you lots of ideas for what to send to your penpals so hopefully you'll be inspired to send a lovely letter to someone in the world!

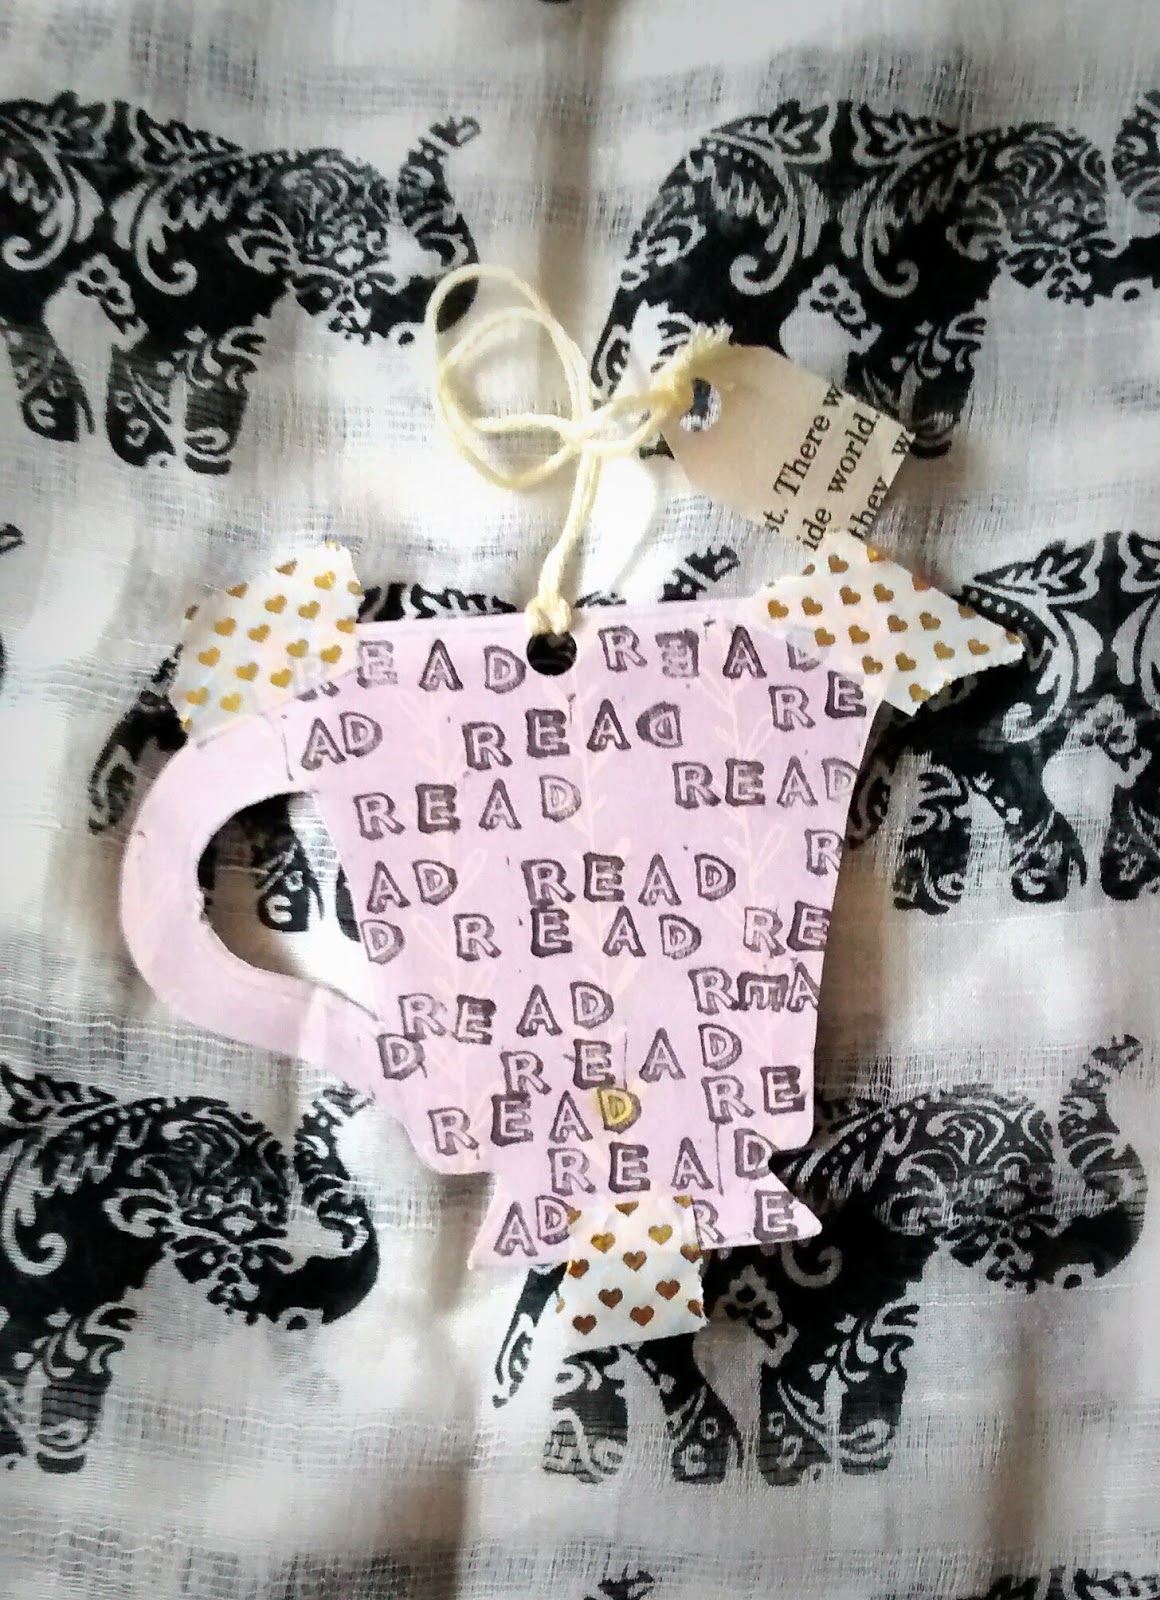
Handmade Teacup Bookmark:
Here's a goodie I made for a penpal. It was for a teaparty themed flipbook that I was making, so I thought it would be perfect! I chose a spare piece of scrapbook paper to make this with. First of all I drew out an outline of a teacup and cut it out, then I used my stamps to create a pattern of the word 'read', after this I punched a hole in the top with a hole punch and finally I attached a piece of string to the bookmark which had a teabag shape attached to it. The string would hang out of the side of a book so you could easily pull it out to get back to reading! By the way, the bits of tape of the photo aren't part of the bookmark!xD


Pretty Gift Tags:
The next item I have to show you are these gorgeous gift tags. I found these particular ones at The Works which had a set of three designs which I think look very boho chic! You can find gift tags in most shops, perhaps you could look in craft shops or card shops? I also love the look of handmade gift tags that I see crafters make! If you want to try making your own gift tags as a goodie for your penpal, you could layer scrapbook papers, washi tape, stickers or any other craft supplies you have to spare.

Teabags:
Lots of people love to receive tea because it's nice to try something new! If you do send tea, then I recommend that you choose something really interesting! The teabag in the picture is a chai tea teabag (this is a great tea for Autumn/Winter and is one of my favourites). This way, your penpal will appreciate the thought behind your unique tea. My chai tea was a Twinings one. The great thing about sending tea is that it is sort of an edible item, which is a type of item you can't normally send, but it is very flat so can be sent easily! You don't have to worry about it melting like chocolate which is always a plus!
Handmade Stickers:
I love to handmake the goodies I send when possible so this is a fun idea! To make my own stickers I take a sheet of sticker paper/label paper and just start drawing! Alternatively, sometimes I print out pictures onto the sheet if I feel like having a more professional looking sticker. In this photo, you can see some teapot and cupcake designs that I drew with black and pastel coloured gel pens. I liked doodling the day away, trying to perfect my mini drawings! I tried out different patterns on each teapot-do you like them? Also, these were for that teaparty themed flipbook that I chatted about earlier!
Decopague pieces:
If you're sending a letter to someone crafty, then you could send them things to craft with. This goodie idea is to send decopague pieces that your penpal can layer to create a kind of 3D picture. There are two types of decopague the first one is the one that I was just talking about (layering pictures until they sort of pop up and look 3D) and the other type of decopague is where you tear up tissue paper (or special decopague) and glue the pieces onto an item.
Handmade Hairclips:
Sometimes I like to send handmade hairclips to penpals. These weren't actually made by me, they were made by Heartfelty (click this link to see her business). However, you can try making your own hairclips if you want! you just need plain clips and crafting supplies such as felt, thread or buttons. Once you've made your design (this one is a teacup design) then you just need to sew it to the clip securely with thread.
Sticky Notes:
Sticky notes are cheap, easy to send yet brilliant goodies that your recipient will appreciate. Most of the time, people will just send 'sticky note samples' of their favourite designs because they want to share them with friends. But you could send a whole pack of sticky notes if you're feeling particularly generous! On this picture, you can see some sticky note samples that were sent to me! I adore the ones on the left because they're so vintage! By the way, sorry that some of the photos are a little blurry, my phone wasn't co-operating! It struggles to focus sometimes!
Handmade Simply Shaped Bookmark:
If you don't feel like making a teacup shaped bookmark, you could make a simply shaped bookmark instead. This is a more traditionally shaped bookmark and is easier to make! This bookmark was sent to me in a flipbook and I really appreciate that they handmade it. I think that they used watercolour to decorate it! I love the pastel colours they chose! There are so many variations of this that you can make. Make it any way you like! This one has corners that are cut at an angle so it could also be made into a gift label if you punched a hole into it and threaded a thread into it!
Project Life Cards:
Project life cards are really great for scrapbooking or creating happy mail with! Unfortunately I haven't found any in shops in the UK, the ones in the picture were sent as a gift. Do any of you know where to buy project life cards in the UK? I would really appreciate your help! I love the colour combination of coral pink and gold on some of these, it's beautiful! You can get project life cards in several sizes so you could use it for several different projects. I'm not sure what the original use of project life cards was or what they're intended to be used for but I use them for anything and everything (or will do when I find them)!
Temporary Tattoos:
Temporary tattoos bring the fun of real tattoos but without the commitment! They're great to wear for a special occasion or party because they are a great alternative to jewellery/accessories. The reason they're perfect to send to penpals is because they are so thin! No extra postage costs! Yippee! There are so many designs to choose from ranging from animals to metallic feathers so you pick out what you think your penpal would like best! These ones in the photo that were sent to me, are metallic bracelet ones!
Washi Tape Samples:
These are my favourite types of goodies to send and receive because I have such an extensive collection of washi tape! It's just so quick and easy to use (and don't forget how super pretty it is)! All you need to do to put together some washi samples, is grab a gift tag, playing card or any sturdy piece of card, then wrap around some washi tape several times. When your letter reaches your penpal then they just unwrap the tape and use it any way they would like to! In this photo the two samples on the left were sent to me and the sample on the right is a goodie from me!
Notebook:
Another cute idea is to send a notebook in the post! You'll have to choose quite a thin, small notebook to fit in the envelope, it might still cost you more than usual because a notebook obviously is thicker than just one piece of paper (most of the other goodies mentioned in this post are a similar thickness to one of two pieces of paper). I bought a set of three small, thin notebooks at a poundshop. There were three cute designs: polka dots, floral pattern and a London pattern! I thought it was quite a bargain so bought it straight away! Here in the photo is one of them in a polka dot design! Penpals can use notebooks for lots of things such as: sketching, creative writing or journalling.
Origami:
Origami is a creative papercraft that anyone can have a go at because there are many ways to fold paper ranging from very easy to complex. I love receiving origami because it shows that the sender has made something especially for me! This origami in the photo was especially cool because it was an origami balloon. An origami balloon can be blown up to look like a balloon or lantern! How fun? It's an awesome idea, I have actually learned how to make origami balloons since receiving this one so I can send them to people too! I think I'll try to improve my origami skills so I can make anything I can think of!


Hairclips:
Earlier I talked about handmade hairclips but if you crafting isn't your thing, you could send hairclips that you bought instead. I absolutely love these hairclips that my penpal sent me! I wear the bow most days to school because it's so cute!Hairclips are great to send because they can be kept forever and used over and over again unlike craft supplies. Hair accessories are some of my favourite things so this was a perfect goodie for me!

Sticker Sheets:
Stickers are simply great! One of the other goodie ideas I mentioned in this post were handmade stickers but if you don't don't have sticker/label paper you can give these instead. Sticker sheets are sold in most craft and stationery shops and are affordable. As a sticker enthusiast, I can tell you that stickers are a great goodie to receive! They're also a nice size to send in the post. These stickers were sent to me and I believe that they're illustrated by Nick Sharrat who illustrates for Jacqueline Wilson so were probably form the Jacqueline Wilson magazine. Magazines often come with little gifts which are perfect as goodies for penpals so I reccommend using them!

I hope I've inspired you all to send a nice letter and goodies to someone! Penpalling is such a fun, rewarding hobby to have and I am thankful to all of my lovely penpals! By the way, sorry if I didn't mention one of your goodies that you sent me, a gorgeous letter just arrived to me in the mail with cute goodies that I love but I had already chosen 15 photos (I thought this post was already really long ha-ha)! I wonder how many times I have said the words 'penpal' and 'goodies' during this post. Has anyone been counting? xD

Over to you...
What goodie ideas do you have or what was your favourite goodie that you received? Or do you not get happy mail? Let me know in the comments!


13 September 2016

Starting a Fashion Sketchbook!

Hello! As you probably know, fashion design is something I am very passionate about. With that in mind, I decided to share a fashion related project with you all this week! At the moment I am working on creating a fashion sketchbook/portfolio to practice my design skills in! I am super excited to start sketching inside my unique portfolio! I'm going to show you how to create your own fashion sketchbook step by step and share some ideas of how to fill it up!

Step 1: Choosing your book
To start your project, you'll need a book such as a large notebook, sketchbook or scrapbook. I bought a plain scrapbook from Paperchase which has some cream pages and some thicker brown pages in the centre. I wanted a plain scrapbook so that I could decorate it later on. However, if you don't want to decorate it like I have, you could buy an already patterned scrapbook (Paperchase has lots of cute patterns such as pineapples and polka dots).

Step 2: Collecting images
If you're planning on decorating your front cover with a collage then you'll need to collect some images that you like. I chose pictures that inspire me because I'll be looking at them every time I start to create a fashion design. You could collect fashion quotes, fashion designs, photos of accessories, your fashion icons and anything else that you would like. You could either print off images you find or cut out pictures from old fashion magazines to use.

Step 3: Putting it together
Now that you've got all of your images ready, you can start decorating the cover! Start by laying out your images until you're happy with the layout. If you start gluing straight away, then you might make mistakes! You don't want that do you? Once you've glued everything down and there's still spaces you could fill them in with stickers or scraps of fabric. Whatever you want really, this is your fashion sketchbook after all!

Step 4: Start designing
Yay! You're ready to start designing! There's lots of things you can do inside your personalised book. You could try:

  • designing a fashion collection for a season or with a theme
  • displaying your fashion styling photos
  • practising drawing fashion figures
  • creating moodboards
  • working on new drawing techniques
  • analysing other designers and stylists work
I hope you enjoyed this week's post! I has lots of fun thinking up ideas of how to fill up fashion sketchbooks/portfolios! The reason I decided to start using a book like this is so I can practice creating something a bit like a portfolio. Whenever I apply to a fashion course, I'll need to show a fashion portfolio. I wouldn't show this portfolio (because the portfolio I show would be created with the course's requirements in mind) but it will be useful to practice developing design ideas right now.

Over to you...
Let me know in the comments if you tried out this project and if it went well! Also, do you have any other ideas of what to do inside this book?

PS: Do you like the new background of my blog? I drew the pineapple pattern myself! If you don't know already, I like to change up the look of my blog every now and then (normally when the season changes but I missed changing it for Summer so I might make a new Autumnal one soon)! 

07 September 2016

Exciting Changes & News

Hello everyone! Sorry that today's post isn't as creative as usual, but that's because I just have to tell you what's been going on so that you all know what changes to expect on my blog! There's some exciting projects I have been working on and some changes that I'm making to the way my blog works! Let's get started!

Pinterest Page:
I recently created a new pinterest page to go along with my blog. Click here to discover it! There are no boards on it as of yet but I am working on several secret boards with topics that you're used to seeing on my blog. The reason I have created another pinterest page (I have a personal one too) is because I wanted to make one for my readers to check out so they can see extra inspiration and tips! It will be good to take a look at inbetween the times when I post things on my blog! It may be awhile before I create public boards because I am trying my best to make them perfect for you all!
Writing For Dreamcatcher:
Last year I wrote a guest post for the author Cathy Cassidy's blog called Dreamcatcher (see the post here) all about my blog. I think that I have improved my content a lot since last year in several ways so I asked Cathy if I could write for dreamcatcher again and she said yes! Yipee! I'm going to be writing a little series of posts about blogging with advice on how to improve your content! I'm super excited for you to see it! I'm not sure when the first post will be uploaded but I'll let you know when (I'm working on the first post now)!

A Change In My Blogging Schedule:
Now that I have made more time for blogging, I have decided to finally have a blogging schedule. From now on, I will try my hardest to upload a post once a week. I'm not going to say a specific day right now because sometimes I need a bit of time to put together the photography and content. However, now that I have decided to post weekly, it means that I can be more consistent in posting. You may have noticed that I have tried to post weekly recently, if you've appreciated that then you'll enjoy the new schedule I'm adopting!

That's all for this week's post- sorry that it doesn't have photos or drawings on it as usual but I hope you enjoyed it all the same!

Over to you:
Let me know in the comments what pinterest boards you want me to make, what blogging tips you'd like to see and any other ideas you may have (perhaps blog post ideas)! I'd love to hear what you think about these changes!